
Easter Dirt cups have been a staple in kids’ party menus for decades. At their core, they’re a playful dessert made from layers of crushed chocolate cookies (to mimic soil) and chocolate pudding (to resemble rich dirt). Typically, they’re topped with gummy worms or similar candies to give the illusion of creatures crawling through the dirt. It’s a fun, tactile dessert that adds a dose of whimsy to any event.
Why They’re Perfect for Easter
Easter Dirt Cups hit that perfect sweet spot of festive, easy, and customizable. Unlike complicated Easter cakes or intricate pastries, dirt cups require minimal baking skills. You can make them with store-bought ingredients in under 30 minutes, making them ideal for busy parents or last-minute party planners.
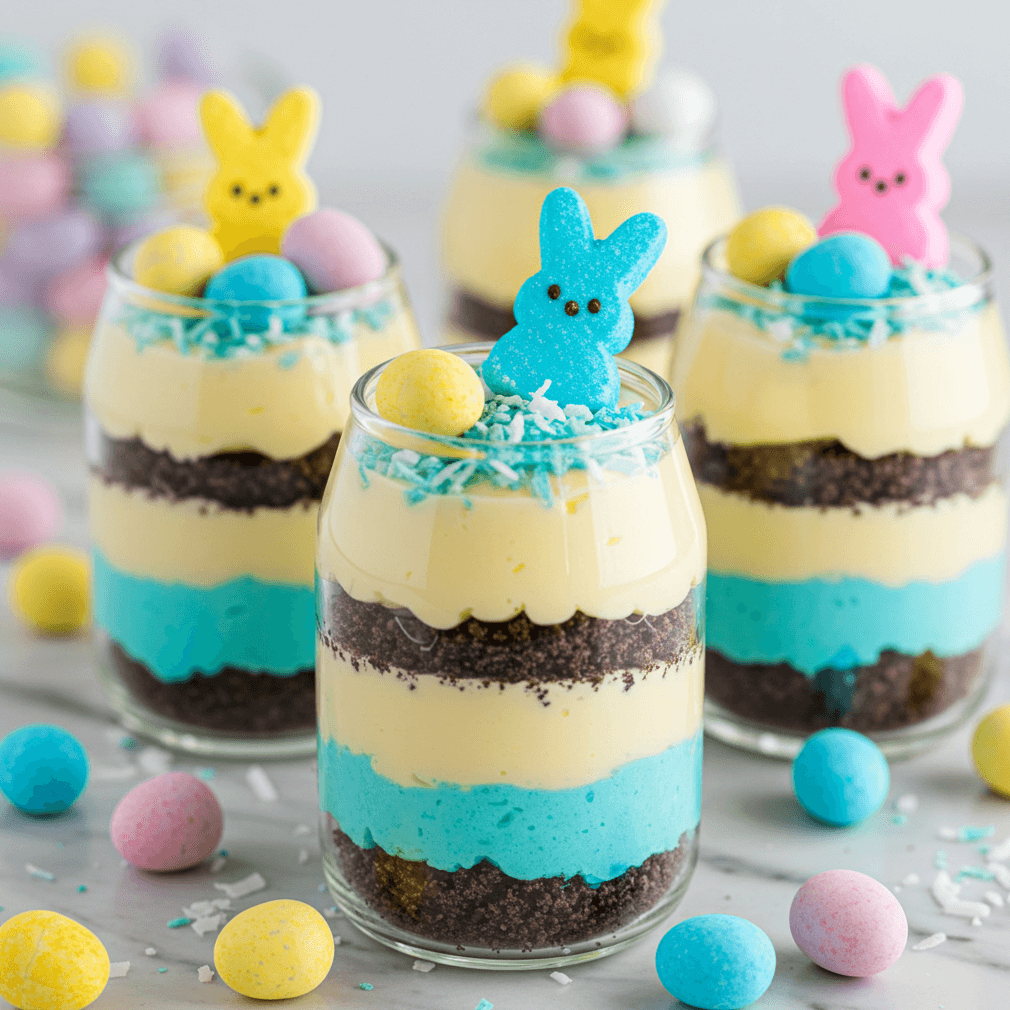
What really makes them shine during Easter is their presentation. You can turn each cup into a miniature edible garden. Imagine topping them with marshmallow chicks (Peeps), mini chocolate eggs, and edible flowers. They instantly become centerpieces for your dessert table.
They also double as a fun DIY craft. Kids love assembling their own cups and decorating them with their favorite toppings. This makes them a perfect activity for Easter parties or family get-togethers.
Key Ingredients Needed for Easter Dirt Cups
Essential Ingredients Breakdown
To whip up a batch of Easter Dirt Cups, you’ll need a few basic items that are easy to find at any grocery store. Here’s your core ingredient list:
-
Chocolate Pudding: The foundation of the “dirt.” You can go with instant pudding mix or ready-to-serve versions for convenience.
-
Crushed Chocolate Sandwich Cookies (Oreos): These become the “soil” layer, giving the cups their signature dirt-like look and crunch.
-
Whipped Topping (Cool Whip or similar): Blended with pudding to make it light and fluffy.
-
Milk: Required if you’re using a pudding mix.
-
Plastic Cups or Mason Jars: For serving.
Each ingredient serves a purpose—not just for taste, but also for texture and presentation. The combination of smooth pudding and crunchy cookies creates a layered experience that’s satisfying in every bite.
Fun Easter-Themed Additions
Now here’s where the magic happens. Add these Easter extras to transform regular dirt cups into festive masterpieces:
-
Marshmallow Peeps: Use chicks, bunnies, or any seasonal shapes to create cute toppers.
-
Mini Chocolate Eggs (like Cadbury or M&M’s eggs): Nestle them into the top layer like a hidden Easter egg hunt.
-
Edible Grass: Usually made from coconut or green-colored shredded candy. Great for an added visual flair.
-
Pastel Sprinkles: Adds color and sparkle.
-
Gummy Worms or Bunnies: Optional, but they give the cups a playful vibe.
The beauty of these toppings is how versatile they are. You can mix and match to suit your taste or theme. Want something more natural-looking? Try using crushed nuts or edible flowers. Going for bold and colorful? Load up on jellybeans and rainbow sprinkles.

Step-by-Step Recipe for Making Easter Dirt Cups
Preparation Process
Getting started is easy. If you’re using instant pudding, follow the instructions on the box. Typically, it involves whisking the pudding mix with cold milk until it thickens. Once it’s ready, fold in the whipped topping to make the mixture creamier and lighter.
Meanwhile, place your cookies in a resealable plastic bag and crush them using a rolling pin. You can also pulse them in a food processor if you want a finer crumb. Be sure to remove the cream filling if you prefer a more dirt-like appearance, though keeping it in adds extra flavor.
Here’s a quick breakdown:
-
Mix Pudding: Whisk together pudding mix and milk, let it set.
-
Fold in Whipped Topping: Gently combine for a mousse-like texture.
-
Crush Cookies: Make your edible dirt.
Assembling the Cups Creatively
Now for the fun part—layering your dessert! Grab your clear plastic cups or jars, and follow these simple steps:
-
First Layer (Cookies): Start with a base layer of crushed cookies.
-
Second Layer (Pudding Mix): Spoon in a generous dollop of pudding.
-
Repeat Layers: Add another cookie and pudding layer if your cup is tall enough.
-
Top with Crushed Cookies: Finish with a final layer of cookie dirt.
Once your base is set, it’s time to decorate. Place a Peeps bunny standing upright, sprinkle some edible grass, and tuck a few chocolate eggs around it. Voila—you’ve got an edible Easter garden.
Let them chill in the fridge for at least 30 minutes before serving. This helps the layers set and makes them taste even better!
Storage Tips for Easter Dirt Cups
How to Keep Them Fresh
Easter Dirt Cups can be made ahead of time, which makes party prep so much easier. Here’s how to store them properly to keep everything tasting fresh:
-
Refrigeration: Always store them in the fridge. The pudding and whipped topping need to stay chilled to hold their texture and flavor. Cover each cup with plastic wrap or use cups with lids if you’re making them ahead of time.
-
Storage Time: They’ll stay good in the refrigerator for up to 2-3 days. Beyond that, the cookie crumbs might get a bit too soggy, and the toppings may lose their texture.
-
Avoid Freezing: Freezing isn’t ideal for this dessert because pudding and whipped toppings can separate when thawed.
If you’re making them with perishable decorations (like fresh fruit), wait to add those until just before serving to maintain freshness and avoid sogginess.
Pairing Ideas for a Complete Easter Dessert Table
Perfect Pairings for a Festive Spread
While Easter Dirt Cups are a showstopper on their own, pairing them with complementary desserts can take your Easter dessert table to the next level. Think of them as the centerpiece with some sweet sidekicks. Here are some crowd-pleasing ideas:
-
Mini Carrot Cakes: A classic Easter treat that pairs wonderfully with the chocolate richness of the dirt cups.
-
Sugar Cookies with Easter Shapes: Bunny-shaped, egg-shaped, or flower-themed cookies decorated with icing and sprinkles.
-
Lemon Bars: Light, zesty, and a great contrast to the chocolate-heavy dirt cups.
-
Fruit Kabobs: Keep it fresh and colorful with strawberries, grapes, pineapple, and blueberries.
-
Cupcakes in Easter Liners: Match your color theme with pastel frosting and edible toppers.
Set everything on a themed dessert table with festive napkins, pastel dishes, and spring flowers. Not only will your guests enjoy the variety, but it also creates a photo-worthy moment that everyone will love.
Conclusion: Easter Dirt Cups Are the Ultimate Spring Dessert
Easter Dirt Cups check every box—they’re fun to make, delightful to eat, and incredibly easy to customize. Whether you’re looking to impress guests with a creative dessert or just want an easy and engaging activity for kids, these sweet little cups bring the magic of Easter right to your table.
They’re adaptable for any dietary need, make-ahead friendly, and double as both dessert and decoration. Plus, who can resist digging into a chocolatey garden topped with bunnies and eggs?
So, as you plan your Easter festivities this year, don’t overlook the humble Dirt Cup. With just a few simple ingredients and a sprinkle of creativity, you can turn an ordinary dessert into an extraordinary celebration.
FAQs
Can I make Easter Dirt Cups without chocolate pudding?
Yes! You can use vanilla pudding and tint it with pastel food coloring for a spring twist. Banana, lemon, or coconut pudding also work great.
How far in advance can I make Easter Dirt Cups?
You can prepare and refrigerate them up to 2 days in advance. Just add toppings closer to serving time to keep them fresh and crisp.
Are there any dairy-free versions of this dessert?
Absolutely. Use dairy-free pudding, plant-based milk, and a non-dairy whipped topping to make the entire dessert vegan-friendly.
Can I use homemade pudding instead of instant mix?
Of course! Homemade pudding adds a rich, custom flavor. Just be sure it’s fully chilled and thickened before layering.
What’s the best type of cup or container to use?
Clear plastic cups or mini mason jars work best. They showcase the layered look and are easy to serve individually.
Print
Easter Dirt Cups
- Total Time: 50 minutes
- Yield: 10 cups 1x
- Diet: Vegetarian
Description
These Easter Dirt Cups are the ultimate springtime treat! Easy to assemble, no baking required, and bursting with chocolatey goodness, these sweet little cups are layered with creamy pudding, crushed cookies, and topped with marshmallow Peeps, candy eggs, and edible grass.
Ingredients
For the base:
2 packages (3.9 oz each) instant chocolate pudding mix
3 cups cold milk
1 container (8 oz) whipped topping (Cool Whip)
1 package (14 oz) chocolate sandwich cookies (like Oreos), crushed
For decorating:
6–8 Marshmallow Peeps (bunnies or chicks)
1 cup mini chocolate eggs (Cadbury, M&M’s, etc.)
1 cup edible Easter grass or green-dyed shredded coconut
Assorted Easter-themed candies or sprinkles (optional)
Optional Substitutions:
Use dairy-free pudding and whipped topping for a vegan version
Gluten-free cookies for a gluten-free option
Fruit instead of candies for a healthier topping
Instructions
Prepare the pudding: In a large mixing bowl, whisk together the chocolate pudding mix and cold milk. Let it sit for about 5 minutes until it thickens.
Fold in whipped topping: Gently fold in the whipped topping until fully combined and the mixture is light and creamy.
Crush the cookies: Place cookies in a zip-top bag and crush them using a rolling pin or pulse them in a food processor until fine crumbs form.
Assemble the cups: In clear plastic cups or mini mason jars, layer about 2 tablespoons of crushed cookies, followed by a layer of pudding mixture. Repeat if your cups are tall enough, finishing with a final layer of cookie crumbs.
Decorate: Add a marshmallow Peep, a few mini chocolate eggs, and a sprinkle of edible grass or colored coconut on top. Get creative!
Chill and serve: Refrigerate for at least 30 minutes before serving to allow the dessert to set and flavors to meld.
Notes
Want to make them ahead? Prepare up to 2 days in advance—just wait to add decorations until you’re ready to serve.
For a colorful twist, use vanilla pudding dyed with pastel food coloring.
Make it a family activity! Set up a DIY decorating station for kids.
Use themed cupcake liners as inserts in your cups for extra flair.
Great as party favors—just cover with a lid or wrap in cellophane and add a ribbon!
- Prep Time: 20 minutes
- Cook Time: 30 minutes