
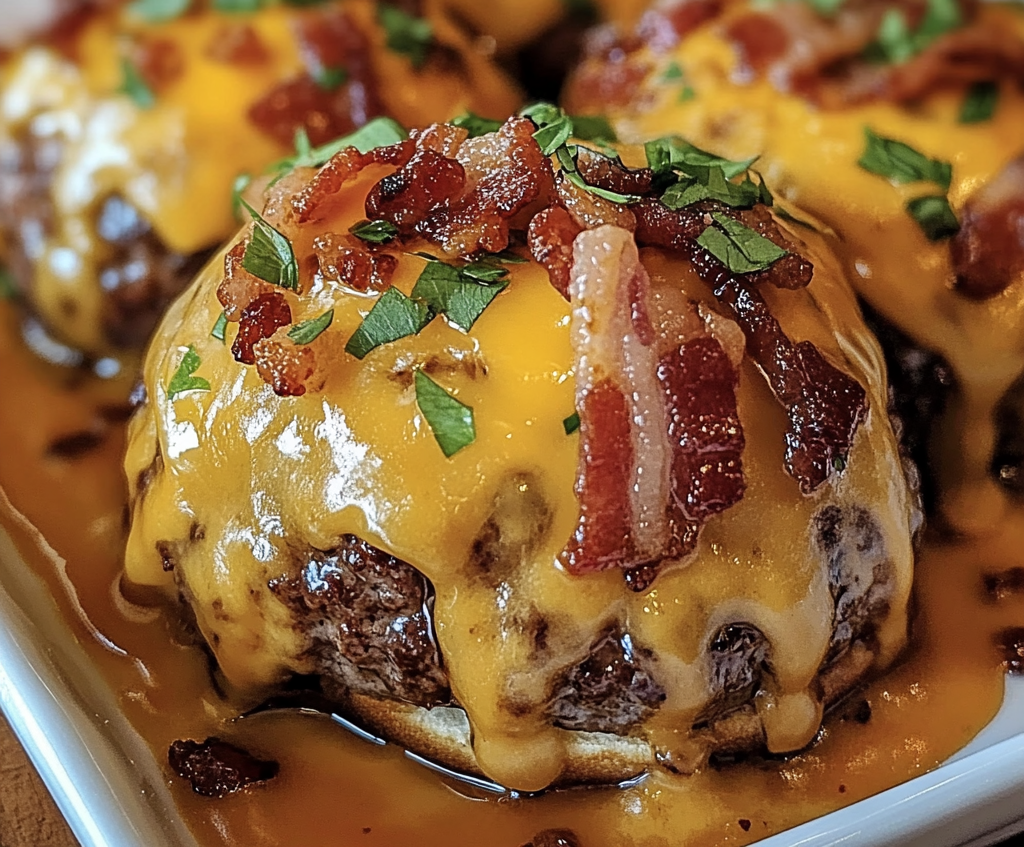
What exactly are bacon cheeseburger bombs? Imagine all the best parts of a classic cheeseburger rolled into a bite-sized treat. They’re made by wrapping a seasoned beef and cheese mixture in dough, then covering it with bacon for an irresistible combination of textures and flavors.
So, why are these little delights such a crowd-pleaser? It’s all about their versatility. Bacon cheeseburger bombs are portable, customizable, and bursting with flavor, making them the ultimate snack for nearly any occasion. Plus, they’re easy to prepare, so even beginner cooks can impress their guests with this recipe.
Ingredients Needed to Make Bacon Cheeseburger Bombs
The beauty of bacon cheeseburger bombs lies in their simplicity. Here’s what you’ll need to make them:
- Ground beef: The foundation of the filling. Choose lean ground beef for the best results.
- Cheese: Cheddar, mozzarella, or a mix of both for that gooey center.
- Bacon: Thin slices work best for wrapping the bombs.
- Crescent roll dough or biscuit dough: Acts as the outer layer that holds everything together.
- Seasonings: Garlic powder, onion powder, salt, pepper, and a touch of Worcestershire sauce for flavor.
Optional add-ins: If you want to spice things up, consider adding diced jalapeños, sautéed onions, or even a dollop of barbecue sauce inside the filling.
For substitutions, feel free to swap out crescent roll dough for puff pastry or use plant-based ground meat to make it vegetarian-friendly.
Step-by-Step Guide to Making Bacon Cheeseburger Bombs
1. Prepare the Filling:
- Cook the ground beef in a skillet over medium heat, breaking it apart as it browns.
- Season with garlic powder, onion powder, salt, pepper, and Worcestershire sauce.
- Once cooked, let it cool slightly before mixing in shredded cheese or placing small cubes of cheese in the center of the filling.
2. Assemble the Bombs:
- Roll out the crescent roll or biscuit dough and cut it into squares.
- Place a spoonful of the beef and cheese mixture in the center of each square.
- Fold the dough around the filling, pinching the edges to seal it.
3. Wrap with Bacon:
- Take a strip of bacon and wrap it around the dough ball, securing it with a toothpick if needed.
4. Cook to Perfection:
- Bake in a preheated oven at 375°F (190°C) for 20-25 minutes until the dough is golden and the bacon is crispy. Alternatively, you can fry them in oil for a crispier finish.
Pro Tip: For an even crispier bacon layer, consider pre-cooking the bacon slightly before wrapping the bombs.
Tips for Perfect Bacon Cheeseburger Bombs
- Avoiding Soggy Dough: Make sure the beef filling is drained of excess grease before assembling.
- Ensuring a Gooey Center: Use high-quality cheese that melts easily.
- Keeping the Bacon Crispy: Pre-cook bacon slightly if you’re baking instead of frying.
Variations and Add-Ons for Your Bacon Cheeseburger Bombs
One of the best things about bacon cheeseburger bombs is how versatile they are. You can adapt them to fit your preferences or the theme of the occasion.
1. Add-Ins to Elevate the Flavor:
- Jalapeños: Add a spicy kick by including diced jalapeños in the filling.
- Caramelized Onions: These add a sweet, savory flavor that pairs beautifully with the beef and cheese.
- Pickles: Dice up some dill pickles for a tangy contrast to the rich filling.
- BBQ Sauce: Swap Worcestershire sauce for a smoky barbecue sauce for a sweet and tangy twist.
2. Adjust for Dietary Preferences:
- Keto-Friendly Option: Use almond flour-based dough or cheese wraps instead of crescent rolls.
- Vegetarian Version: Substitute ground beef with plant-based ground meat or crumbled tofu seasoned with the same spices.
- Gluten-Free Option: Use gluten-free dough or even lettuce wraps for a low-carb alternative.
Why Bacon Cheeseburger Bombs Are the Ideal Party Appetizer
HPerfect for Any Occasion
Bacon cheeseburger bombs fit seamlessly into any gathering. Whether you’re hosting a casual family dinner or throwing a lively game-day party, they’re guaranteed to be a hit. Their handheld size makes them easy to eat without utensils, making them a great choice for potlucks or outdoor gatherings.
For family events, they can even double as a kid-friendly option—just leave out the spicier add-ins! For a more sophisticated twist, you can serve them alongside upscale dips like truffle aioli or roasted garlic mayo.
Easy to Customize for Your Guests
Hosting a party with guests who have different tastes? Bacon cheeseburger bombs are incredibly easy to customize. Set up a DIY assembly station where guests can pick their preferred add-ins before wrapping the bombs in dough and bacon.
Make-Ahead Options: You can assemble the bombs ahead of time and refrigerate them. Simply bake or fry them fresh when it’s time to serve.
Nutritional Information and Balancing Indulgence
It’s no secret that bacon cheeseburger bombs are indulgent. However, with a bit of moderation, you can enjoy them guilt-free.
- Portion Sizes: Each bomb is rich and filling, so two or three per person can be a satisfying serving.
- Pairing with Healthier Options: Balance the richness of the bombs with lighter side dishes like a mixed green salad or roasted vegetables.
- Calories: On average, each bomb contains around 150-200 calories, depending on the size and ingredients.
Pairing Bacon Cheeseburger Bombs with the Perfect Sides
Dipping Sauces That Elevate the Flavor
Dips can take your bacon cheeseburger bombs to the next level. Here are some crowd-pleasing options:
- Ranch Dressing: A classic dip that complements the savory flavors.
- BBQ Sauce: Adds a smoky, sweet contrast.
- Sriracha Mayo: For those who like a spicy kick.
- Honey Mustard: A tangy-sweet option that pairs perfectly with the bacon.
Serve the dips in small bowls to give your guests plenty of choices.
Complementary Side Dishes
If you’re serving bacon cheeseburger bombs as part of a larger meal, consider pairing them with:
- Fresh Salads: A crisp Caesar salad or a refreshing cucumber-tomato mix can balance the richness of the bombs.
- Fries or Tater Tots: These classic sides complete the comfort-food vibe.
- Roasted Vegetables: For a healthier option, roast some broccoli or asparagus with a touch of olive oil and garlic.
Storing and Reheating Bacon Cheeseburger Bombs
Proper Storage Tips
To keep your leftovers fresh:
- Refrigeration: Place the bombs in an airtight container and store them in the fridge for up to 3 days.
- Freezing: Wrap each bomb individually in foil or plastic wrap, then place them in a freezer-safe bag. They can be frozen for up to 2 months.
Reheating for Maximum Flavor
Reheating bacon cheeseburger bombs properly ensures they taste just as good as when freshly made:
- Oven Method: Reheat in a preheated oven at 350°F (175°C) for 10-12 minutes to maintain crispness.
- Air Fryer: Heat at 375°F (190°C) for 5-7 minutes for the crispiest results.
- Microwave: Use for a quick reheat, but note that the bacon may lose some of its crispiness.
Bacon cheeseburger bombs are a versatile, mouthwatering treat that’s perfect for any occasion. They’re easy to make, customizable to suit various tastes, and sure to impress anyone who takes a bite. Whether you’re preparing them for a casual family dinner or a big party, they’re guaranteed to be a hit.
So go ahead and give these flavor-packed bombs a try—you might just find they become a new favorite in your recipe collection!
FAQs
1. Can I make bacon cheeseburger bombs ahead of time?
Yes! You can assemble them in advance and refrigerate them for up to 24 hours before baking or frying.
2. Can I air-fry bacon cheeseburger bombs?
Absolutely! Air-frying at 375°F (190°C) for about 12-15 minutes results in crispy, golden bombs.
3. How can I make these bombs vegetarian?
Swap the ground beef for plant-based meat alternatives and use vegetarian bacon or omit it entirely.
4. What’s the best way to ensure the bacon stays crispy?
Pre-cook the bacon slightly before wrapping the bombs or opt for thinner bacon slices.
5. Can I substitute crescent dough with puff pastry?
Yes, puff pastry works great and adds a flaky texture to the bombs. Just keep an eye on the cooking time as it may vary.
Bacon Cheeseburger Bombs
- Total Time: 40 minutes
- Yield: 8 bacon cheeseburger bombs 1x
Description
Bacon cheeseburger bombs are bite-sized bursts of flavor, combining juicy ground beef, gooey cheese, and crispy bacon, all wrapped in a soft dough. Perfect for parties, family dinners, or game-day snacks, these delicious treats are easy to customize and sure to impress everyone at the table!
Ingredients
- 1 lb ground beef
- 1 cup shredded cheddar cheese (or small cheese cubes)
- 8 slices of bacon
- 1 can crescent roll or biscuit dough
- 1 tsp garlic powder
- 1 tsp onion powder
- 1 tbsp Worcestershire sauce
- Salt and pepper to taste
- Optional add-ins: Diced jalapeños, sautéed onions, diced pickles, or BBQ sauce.
Instructions
Step 1: Prepare the Filling
- Heat a skillet over medium heat.
- Cook the ground beef until browned, breaking it apart with a spoon.
- Season with garlic powder, onion powder, Worcestershire sauce, salt, and pepper.
- Drain any excess grease, let the mixture cool slightly, then stir in the shredded cheddar cheese (or place a cheese cube in the filling when assembling).
Step 2: Assemble the Bombs
- Roll out the crescent roll or biscuit dough and cut into 8 squares.
- Place a spoonful of the beef mixture in the center of each square.
- Fold the dough around the filling, pinching the edges to seal completely.
Step 3: Wrap in Bacon
- Wrap each dough ball with a slice of bacon, securing with a toothpick if necessary.
Step 4: Bake or Fry
- Preheat the oven to 375°F (190°C).
- Place the bombs on a lined baking sheet and bake for 20-25 minutes, or until the bacon is crispy and the dough is golden brown.
- Alternative: Fry the bombs in oil until golden and crispy for an extra indulgent treat.
Notes
- Make-Ahead Tip: Assemble the bombs and store them in the fridge for up to 24 hours before baking or frying.
- Crispy Bacon: Pre-cook the bacon slightly if you want it extra crisp.
- Customizations: Add jalapeños for heat or swap crescent dough for puff pastry for a flakier texture.
- Dietary Swaps: Use gluten-free dough for a gluten-free version or plant-based meat for a vegetarian option.
- Prep Time: 15 minutes
- Cook Time: 25 minutes